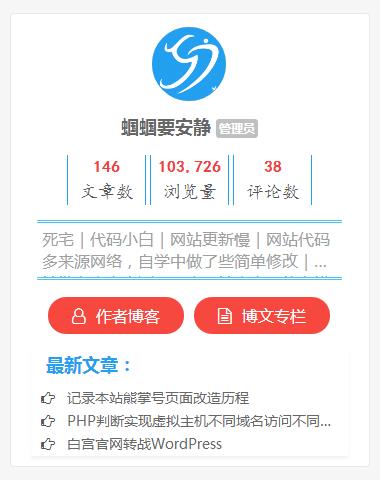
最近给博客添加了一个显示作者信息的小工具,网上也有很多关于边栏显示作者信息的实现方式,但是大多都需要我们再修改代码中的一些信息,很是麻烦,于是自己借鉴了很多网上的代码并优化成了目前我所使用的这款显示作者信息小工具。下面是小工具前端显示的截图,希望你喜欢。
对于社交信息的获取,由于并不是所有主题都会有微博、QQ、微信等信息的获取,这里我只获取了用户信息中的博客地址及作者博文的内容,当然你也可以通过增加这些字段来实现更多社交媒体的选项。具体增加方式以增加微博社交信息为例,在function.php文件中添加如下代码:
//增加用户信息自定义字段
function qgg_contactmethods( $contactmethods ) {
    $contactmethods['weibo'] = '微博';
    return $contactmethods;
}
add_filter('user_contactmethods','qgg_contactmethods',10,1);
好了,现在我们来看下作者信息小工具的具体实现。先来说一下我所目前正在使用的DUX主题。
新增 widget-qggauthorinfo.php 文件
新建一个 widget-qggauthorinfo.php 的文件,并在其中添加如下代码:
<?php
/*
Widget Name:QGG作者信息
Description:显示当前文章的作者信息
Version:1.0
Author:蝈蝈要安静
Author URL:http://blog.quietguoguo.com
*/
//DUX主题直接使用此代码即可,其他主题可能需要使用下面的代码注册小工具
//add_action('widgets_init', create_function('', 'return register_widget("widget_ui_qggauthorinfo");'));
class widget_ui_qggauthorinfo extends WP_Widget {
function widget_ui_qggauthorinfo() {
$widget_ops = array('description' => '显示当前文章的作者信息!');
$this->WP_Widget('widget_ui_qggauthorinfo', 'QGG作者信息', $widget_ops);
}
function update($new_instance, $old_instance) {
return $new_instance;
}
function widget($args, $instance) {
extract( $args );
echo $before_widget;
echo widget_ui_qggauthorinfo();
echo $after_widget;
}
}
//获取作者所有文章浏览量
if(!function_exists('qgg_author_posts_views')) {
function qgg_author_posts_views($author_id = 1 ,$display = true) {
global $wpdb;
$apvn = "SELECT SUM(meta_value+0) FROM $wpdb->posts left join $wpdb->postmeta on ($wpdb->posts.ID = $wpdb->postmeta.post_id) WHERE meta_key = 'views' AND post_author = $author_id ";
$author_posts_views = intval($wpdb->get_var($apvn));
if($display) {
echo number_format_i18n($author_posts_views);
} else {
return $author_posts_views;
}
}
}
//获取作者参与评论的评论数
if(!function_exists('qgg_author_posts_comments')) {
function qgg_author_posts_comments( $author_id = 1 ,$author_email='' ,$display = true) {
global $wpdb;
$apcn = "SELECT count(comment_author)
FROM $wpdb->comments WHERE comment_approved='1' AND comment_type='' AND (user_id = '$author_id' OR comment_author_email='$author_email' )";
$author_posts_comments = intval($wpdb->get_var($apcn));
if($display) {
echo number_format_i18n($author_posts_comments);
} else {
return $author_posts_comments;
}
}
}
function widget_ui_qggauthorinfo(){
?>
<div class="author_box">
<div class="author_info">
<div class="author_avatar">
<a href="<?php echo get_author_posts_url( get_the_author_meta( 'ID' ) ) ?>"><?php if (function_exists('get_avatar')) { echo get_avatar( get_the_author_email(), '80' ); }?></a>
</div>
<!--<a class="author_pic"><img src="头像链接"></a>预留,目前使用的Gravatar头像,看看以后能不能自定义上传头像-->
<div class="author_name">
<?php the_author_posts_link(); ?>
<span>
<?php $user_id=get_post($id)->post_author;
if(user_can($user_id,'install_plugins')) {
echo '管理员';
}elseif(user_can($user_id,'edit_others_posts')) {
echo '编辑';
}elseif(user_can($user_id,'publish_posts')) {
echo'作者';
}elseif(user_can($user_id,'delete_posts')) {
echo'投稿者';
}elseif(user_can($user_id,'read')) {
echo'订阅者';
}?>
</span>
</div>
<div class="author_tongji">
<div class="author_card">
<span class="author_card_n"><?php the_author_posts(); ?></span>
<span class="author_card_t">文章数</span>
</div>
<div class="author_card">
<span class="author_card_n"><?php qgg_author_posts_views( get_the_author_meta('ID') ); ?></span>
<span class="author_card_t">浏览量</span>
</div>
<div class="author_card">
<span class="author_card_n"><?php qgg_author_posts_comments( get_the_author_meta('ID') ,get_the_author_meta('user_email')); ?></span>
<span class="author_card_t">评论数<?php echo get_the_author_meta('ID '); ?></span>
</div>
</div>
<div class="author_des">
<?php the_author_description(); ?>
</div>
<div class="author-social">
<span>
<a href="<?php echo get_the_author_meta('user_url'); ?>" rel="nofollow" target="_blank"><i class="fa fa-user-o" aria-hidden="true"></i>  作者博客</a>
</span>
<span>
<a href="<?php echo get_author_posts_url( get_the_author_meta( 'ID' ) ) ?>" rel="nofollow" target="_blank"><i class="fa fa-file-text-o" aria-hidden="true"></i>  博文专栏</a>
</span>
</div>
</div>
<div class="author-posts">
<h3>最新文章:</h3>
<ul>
<?php
$author_id = get_the_author_meta('ID');
global $wpdb;
$result = $wpdb->get_results("SELECT comment_count, ID, post_title, post_date FROM $wpdb->posts WHERE post_status='publish' AND post_type='post' AND post_author = '$author_id' ORDER BY ID DESC LIMIT 0 , 3");
foreach ($result as $post) {
setup_postdata($post);
$postid = $post->ID;
$title = $post->post_title;
?>
<li class="author-list">
<i class="fa fa-hand-o-right"></i>   <a href="<?php echo get_permalink($postid); ?>" title="<?php echo $title ?>"><?php echo $title ?></a>
</li>
<?php } ?>
</ul>
</div>
</div>
<?php
}
?>
这是这次主题修改的核心文件,其中的一些代码大家可根据自己需要进行删改,比如你想增加更多社交信息可修改102-109这段代码实现。
修改 widget-index.php 文件
DUX主题对其所有小工具的调用都是通过 widget-index.php 文件来实现的,添加完上述代码后我们需要在该文件中找到如下代码并添加上 ‘qggauthorinfo’, 这一字段。该数组中的每一个字段对应DUX主题 widgets 文件夹下的一个小工具,大家可对应了解。
$widgets = array(
	'sticky',
	'statistics',
	'ads',
	'textads',
	'comments',
	'posts',
	'readers',
	'tags'
);
值得注意的是,’tags’ 这个字段后面没有结束“,”符号,所以如果大家添加到该字段后注意一下。当然,为了避免大家添加中错误,建议添加到原有两个小工具对应字段中间,比如这里你可以添加到 ‘posts’, 与 ‘readers’, 之间。
修改 main.css 文件
添加如下代码至你主题的主样式文件中,DUX主题添加到 main.css 文件中即可。
/*作者信息小工具CSS样式*/
.author_box {
    background-color:#fff;
    border-radius:2px;
    clear:both;
    position:relative;
    margin:10px;
}
.author_info {
    display:inline-block;
    position:relative;
	width: 90%;
    height:auto;
    margin:auto 5%;
    color:#A09F9F;
    border:0px solid #eceef1;
}
.author_avatar img {
	width: 100%;
	height: 100%;
	display: block;
    border-radius: 50%;
    -webkit-border-radius: 50%;
    -moz-border-radius: 50%;
}
.author_avatar  {
    display: block;
    border-radius: 50%;
   -webkit-border-radius: 50%;
    -moz-border-radius: 50%;
}
.author_avatar a{
    display: block;
    width: 80px;
    height: 80px;
    margin: 0 auto;
    background: #C9C9C9;
    border-radius: 50%;
    border: 3px solid #fff;
    -webkit-border: 3px solid #fff;
    -moz-border: 3px solid #fff;
}

.author_name {
    height: 26px;
    line-height: 26px;
    margin: 10px 0;
    font-weight: bold;
    font-size: 18px;
    text-align: center;
}
.author_name span {
    font-size: 9px;
    background: #C0C0C0;
    color: #FFFFFF;
    padding: 1px 3px;
    -webkit-border-radius: 3px;
    -moz-border-radius: 3px;
    border-radius: 3px;
    position: relative;
}


.author_tongji {
    position:relative;
    margin:15px 20px;
    left:3%;
}

.author_card {
    display:inline-block;
    position:relative;
    height:50px;
    width:30%;
    margin:0px;
    color:#555555;
    border-left:1px solid rgba(36, 160, 240, 1);
	border-right:1px solid rgba(36, 160, 240, 1);
}

.author_card_n {
	color:rgba(240, 66, 66, 1);
	font-size:16px;
	font-family:黑体;
	font-weight:bold;
    display:block;
	width:100%;
    height:25px;
    top:5px;
    text-align:center;
}

.author_card_t {
	font-size:18px;
	font-family: 楷体;
    display:block;
	width:100%;
    height:25px;
    position:absolute;
    top:25px;
	text-align:center;
}

.author_des {
	font-size:16px;
    padding:5px;
    height:60px;
    text-overflow:ellipsis;
    display:-webkit-box;
	-webkit-line-clamp:2;
    -webkit-box-orient:vertical;
	overflow:hidden;
    word-break: break-all;
	border-top:3px double rgba(36, 180, 240, 0.8);
	border-bottom:3px double rgba(36, 180, 240, 0.8);
}

.author-social {
	margin:18px 0px 0px;
    text-align:center;
}
.author-social a {
    border:1px rgba(0,0,0,0.15) solid;
	margin:3px;
    padding:8px 24px;
    cursor:pointer;
    background-color:#F74840;
    border:0px solid rgba(36, 180, 240, 1);
    color:#fff!important;
    height:36px;
    line-height:36px;
    font-size:16px;
    border-radius:999em;
}
.author-posts {
    background-color:#fff;
    border-radius:2px;
    clear:both;
    position:relative;
    margin:10px;
    -webkit-box-shadow:0px 3px 3px 0px rgba(0,0,0,0.05);
    -moz-box-shadow:0px 3px 3px 0px rgba(0,0,0,0.05);
    box-shadow:0px 3px 3px 0px rgba(0,0,0,0.05);

}
.author-posts h3 {
	background:none;
	border:0px solid rgba(36, 180, 240, 1);
	color:rgba(36, 160, 240, 1);
	font-size:18px;
	font-weight:bold;

}
.author-list {
	margin:3px 10px;
	font-size:14px;
    word-break: break-all;
    white-space: nowrap;
    overflow: hidden;
    text-overflow: ellipsis;
    border:0px solid rgba(36, 180, 240, 1);
}
由于主题的不同及其他原因,样式代码可能会出现错位等现象,可能需要大家根据自己情况微调一下。
其他主题修改
对于其他 WordPress 主题直接使用上述代码可能无法在外观小工具下显示该工具,我们需要将 widget-qggauthorinfo.php 中注册小工具的代码打开,同时我们需要在 function.php 文件中添加如下代码加载这个 PHP 文件。注意修改下代码中的路径!
require_once get_stylesheet_directory() . '/widgets/widget-qggauthorinfo.php';
为了避免大家复制代码出错,文末我会附上 main.css 与 widget-qggauthorinfo.php 这两个主要文件的下载,有需要的同学可以下载使用。
代码参考: